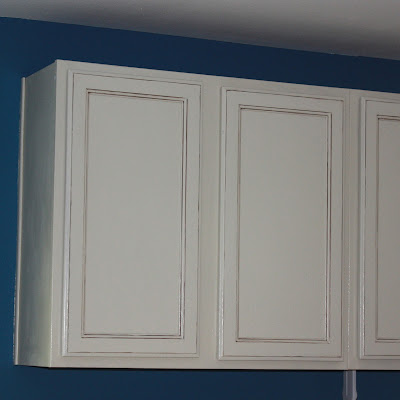
A new kitchen can cost a lot of $$
Mine: Under $100 (for the cabinets)- and a lot of work {TLC}.
Do you want to know what I LOVE about my kitchen...its unique and my own personal style-so if you don't like the colors here-try doing your own cabinets and {add your own unique flare}. I had never done anything like this before-so if I can do it SO CAN YOU!!
{The Before:}
dull-colorless-drop lighting-laminate floor curling-gross and grimy
The first thing that HAD to go was the fluorescent light fixture. The hubby killed the breaker to the fixture and went to work-this part made me nervous since he is definitely not an electrician (well, at least he wasn't but can probably claim to be so now after all the electrical he did in our house).
We then removed all cupboards and drawers and took of all hardware. Then came the HARDEST part: the cleaning and sanding.
{The key to a successful paint job is PATIENCE}
These cupboards were covered in every corner with dust and grime. The grime had been sitting for so long it was sticky and hard to remove. I knew I had to get it all up, or else the paint would not adhere to the areas of yucky build-up.
{Great Cleaning Tip: Mix equal parts of DAWN original dish soap with white vinegar}
I was fortunate enough to have a power belt sander that I was able to use on the larger surfaces of the cabinets to then sand them down. The corners I did by hand. Choose which sandpaper you would like to use after reading HERE.
After sanding I used a PURDY brush that I purchased from Home Depot (I LOVE using Purdy because even while painting, I would get frustrated because it would look slightly streaky, but when it dried it looked perfect!) So don't get frustrated!
After painting everything in one coat-I let everything dry for over 24 hours. Then i LIGHTLY (very lightly) sanded everything down again using extremely FINE sandpaper. Make sure to remove all sandpaper dust before putting a second coat of paint on.
Then, paint away.
The second coat is a lot less frustrating and goes much more quickly.
Once the second coat dried, I used a foam brush and dabbed the edges of each groove of the cabinet doors and drawers to give it an antique look (see below: although I completed this step while all the cabinets where still removed...much easier). The nice part about using glaze is that it is pretty forgiving if you mess up. Just have a damp cloth on hand, and if you feel you mess up, wipe it away quickly.
Once you let the glaze dry-Add a protective coat to your cabinets. Cabinets can really get hashed and trashed so you want to make sure you protect your hard work!!
I used a Polyurethane from Home Depot and just followed the directions on the can, and it is a pretty tough coat and has worked great!

{The After:}
{I LOVE my Kitchen}
Supplies:
1 gallon can of BEHR paint+primer: $38.98
1 quart Polyurethane: $10.77
1 quart brown glaze: $15.97
1 Purdy angled brush: $14.77
Foam Brushes: Around $5
Sandpaper: $10
Total Cost: $95.59


I love the kitchen, Liesel- makes me want to do it to mine!
ReplyDeleteThanks! I love it too :)
DeleteWhat color is that blue on the walls?
ReplyDeleteGorgeous. I have some really nice cabinets in my home and want to paint them white, because they are that awful outdated oak that doesn't go with any other color. My husband is hesitant. I think I'll test on my bathroom cabinets first to try to convince him. Going to use your technique.
ReplyDelete